Showing posts with label Recipe. Show all posts

Thursday, February 6, 2014

pork stuffed bell peppers

a week or two ago, i made some stuffed peppers and posted the delicious picture on my instagram. that means i've sworn myself into sharing the recipe. let me warn you, this is different from any other stuffed pepper recipe you will find. i have tried other recipes and didn't like them... peppers were mushy and overpowered all other flavors. so when i imagined up these little guys, i wanted to have something flavorful, delicious, and not tomatoey or too soft. and well, it worked. and we loved them! so enjoy!


pork stuffed bell peppers

ingredients:
3 large green bell peppers 
1lb package of pork sausage
1 small onion, chopped
1/2 cup of cooked brown rice*
garlic powder
1/4 cup of sour cream
2 heaping tbsp ketchup
1 egg
1 tsp paprika
salt and pepper

*because brown rice takes so long to cook, i always make a bunch so i have plenty of left overs into he fridge. 

instructions:
cut the tops out of the bell peppers. i cut a nice big circle and get all the seeds out. cut as much pepper from the circles as you can (the edible part), chop, and set aside. then cut each pepper in half from top to bottom.  place pepper halves on baking sheet and set aside.

in a large skillet, cook pork sausage with onions, peppers, garlic, and desired salt and pepper. when meat is fully cooked add rice and mix. 

in a small bowl (or i use my over sized measuring cup), mix remaining ingredients until well blended, then add the mixture to meat and rice. 

divide meat mixture between peppers. pack it in, they will be overflowing. bake hole side up at 350 degrees for about 20 minutes. if you want your peppers a little softer, bake for 30 minutes. like i said earlier, i like mine with a little crisp. 

enjoy!

Tuesday, January 14, 2014

tropical pineapple crisp

on sundays after church, brock and I go to his grampa's house for lunch and to play cards. we usually have delicious, fried, greasy, not very healthy food of the south accompanied by a cakes or pies or other desserts whipped up by brock's baker of an aunt. last sunday, however, we stayed at home, i crock-potted some pork, and we had a quiet afternoon to get our heads on straight before we went back to work and real life.

being the health nuttos that we are... i didn't have any treats! bah! we needed to have treats on sunday. so i thought i would whip up an apple crisp, one of my favorites that mama used to make... but we didn't have any apples. wer wer. but we did have some canned pineapple rings so i decided to invent a whole new recipe! whoop! it was delicious so i shall share it with you.

disclaimer: alcohol has never touched these lips, just not my thing. but rum extract has. and good gracious, i don't know who's brilliant//dangerous idea that was, but mercy, don't leave it out. 


tropical pineapple crisp

ingredients:

1 can of pineapple rings,drained and juice set aside
8 tbsp brown sugar, divided
1 cup of rolled oats
4 tbsp flour
1/2 cup chopped nuts [we used pecans]
1/2 cup unsweetened coconut
1/4 tsp coconut extract
1/4 tsp rum extract
coconut milk if desired

instructions:

spray an 8x8 or 9x9 pan with olive oil or spread with coconut oil. lay out drained pineapple rings to fill the bottom of the pan. it's ok if they overlap. sprinkle 4 tbsp of brown sugar on top and set aside.

in a medium bowl combine the remaining brown sugar with oats, flour, and nuts. combine extracts and coconut, then add to the other mixture [i wanted to make sure the extract flavors were in every bite, so i measured the coconut in a cup too big]. spread dry mixture over pineapple rings. pour 1/4-1/2 cups of pineapple juice over the mixture, enough to moisten it. 

bake at 350 degrees for about 20 minutes or until the top begins to turn golden. drizzle coconut milk on top of desired and enjoy warm! 

Tuesday, July 9, 2013

watermelon salsa

if you have been following my instagram, you know what's coming!


that's right my friends, watermelon salsa. does anyone else crave fruit like crazy when the sun is blazing? i love it. watermelon. mango. strawberry. pineapple. you name it, i'll eat it!

fruit salsas are definitely one of my favorite ways to go. they are just so fresh and delicious. it's probably that zingy lime!

my daddy always made mango salsa for cinco de mayo and i loved it! i had never tried any other fruit salsa... until now! on the 4th of july, brock and i were enjoying a fabulous, good-home-cookin kind of breakfast with his parents and grandparents while rachael ray shared her watermelon palooza show with us! there were some genius things i had never thought of before... like watermelon ice cubes {duh! they don't melt and water down your drink, and you can eat them after}! or watermelon popcicles {another duh! put it on a stick and freeze it, baby!}. but the best was the salsa.

so i immediately went out and bought a watermelon!... two days later after all the fun and fireworks. and of course, like with any other recipe, i did a little tweeking. so here's the original from ray ray complete with a video. or you can just take my word for it and try it out yourself. you will swoon.


watermelon salsa

ingredients:
3 cups of watermelon in tiny little cubes
1/2 of a cucumber, peeled, seeded and also in tiny little cubes
2-3 jalapenos seeded and chopped teeny, teeny, tiny
1/4 of a red onion, chopped
a small handful each of fresh cilantro and mint, chopped*
zest and juice of 2 limes
salt

instructions:
combine all ingredients in a bowl.

definitely do what rachael ray says and salt right before serving! salt makes food extract liquid and will bring out a lot in those little watermelon pieces. so don't do it ahead of time.

serve with tortilla chips, or with some meeeat! {we had ours with steak and it. was. good.}
it's super delicious with totino's tortilla chips with a hint of lime!

*i say handful because it is hard to measure herbs, so just eyeball it, but try to keep them equal.


now go buy a watermelon!
brock and i seriously ate the whole bowl. good thing it's all fruit and healthy stuff, i didn't feel quite so guilty!

Monday, June 24, 2013

chicken + strawberry salad

summer is for salads. 

all kinds of salads. they come in a lot of variety {which is good for us creative folks}. i am especially in love with the combination of chicken and fruit in salads. today, i'm going to share one of my favorite summer salads, but first, a story. 


my gramma is the best gramma ever {so everyone, be jealous}. she found this adorable little tea shop back home in the "a" state called chantillies. it's basically the most frilly, girly, lacy, pink place you could ever imagine. it's the kind of place that is only open for lunch. the kind of place that you dress up for. the kind of place with decor that only says flowers and tea cups. none of the place settings match, but they all go together. fresh lemonade is always on the menu, and everything is fresh and delightful. 

on one of my trips to chantillies with my gramma {i believe this was with my mama and little sissy}, we ordered the chef's daily special: chicken strawberry salad. now, this is my version that i am sharing with you. obviously, it won't be identical. that's why it was a special. but it's still delicious, and eating it makes me think of my gramma. win win.


chicken strawberry salad [gf, df]

makes 4 servings

ingredients:
8 leaves of romaine lettuce, rinsed
2 chicken  breasts, cooked and cooled
8-12 strawberries, depending on size
1 can of mandarin oranges, drained, juice set aside
1/2 cup of chopped nuts, walnut or pecan are best
1/2 cup of tiny cubed mild cheese, like edam, or fontina **optional**

2 tbsp yellow mustard
2 tbsp honey
pepper

other delicious ingredients not included in this picture or my latest serving:
green onions
craisins
pineapple

instructions:
layer the first 6 ingredients in order, dividing between four plates, or putting it all in one bowl.

take 2 tbsp of the reserved manderin orange juice and stir with the mustard, honey, and pepper. 

drizzle it on top and enjoy with a glass of fresh lemonade for the perfectly refreshing, cool summer lunch!


Wednesday, June 12, 2013

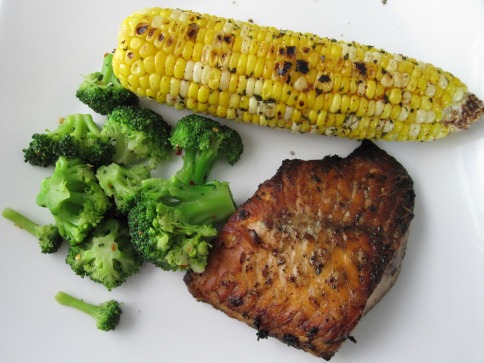
easy peasy grilled salmon + corn on the cob

it's recipe time. a couple weeks ago, i shared a recipe on kory's blog. that was my barbeque pork steaks. today, i'm gonna share a recipe for grilled salmon and corn on the cob.

have you noticed the theme? you got it... grilling! i'm getting pretty good, if i'm allowed to say so! brock was very please with last night's dinner, and so was i. so i hope you like fish.

i only say that, because not long ago, i wasn't a fan. but i'm a fan of butter and garlic. so why not put it on some fish and grill it? right or right?

i know fish can be a little pricey. we don't eat it often, but every once in a while, it's a nice change. and the health benefits definitely make the cost a little easier. i need those omega3's, people! so do you. so do your self a favor and get some salmon this week!


grilled corn on the cob

makes 4 servings

ingredients:
4 cobs of corn
2 tablespoons of olive oil
garlic
dried cilantro [if you don't have this, parsley is a good substitute]
chili powder
salt + pepper
aluminum foil

instructions:
1. shuck corn and place in cold water, completely covered for about 10 minutes. this gives it a little extra moisture. they float, so you may have to put something heavy on them to keep them under the water.

2. after removing from the water, shake them to get all the excess. place each cob, diagonally, on a square sheet of aluminum foil.

3. drizzle olive oil over each cob, and spread it until the corn is well covered. sprinkle on desired amounts of seasoning. wrap up the foil nice and tight to keep the moisture in.

4. grill the cobs for 5 minutes on each side over medium heat [turn about a quarter of the way each time for a total of 20 minutes].*

grilled salmon

makes 4 servings

ingredients:
4 salmon filets
3 tablespoons butter {real butter, not margarine, not vegetable spread, those are way worse for you than butter, just get some butter, ok?}
3-4 cloves of garlic, minced---depends on size, 3 larger, 4 smaller
salt + pepper

instructions:
[do this while the corn is soaking!]
1. melt the butter in the microwave, maybe 20 seconds. add garlic and stir. salt and pepper salmon filets, then spread the butter on each side with a basting brush. 

2. grill salmon on each side for 7 minutes, over medium heat.


*i just grilled my corn on one half for the 7 minutes along with the salmon, then flipped half way over for the second round. after i removed the salmon from the grill, i grilled the corn on the quarter sides for 2 or 3 minutes. it worked just fine and made for less opening of the grill during the cooking process of the fish.

Monday, June 3, 2013

my life monday + micro nature

a couple weeks ago, i told you i was going to start a series. well this is the first! it's a my life monday!

basically, this is going to be the only time i will blab on about the lame goings on, or sometimes exciting goings on, of my life, instead of just running on and on about how crazy life is. i will leave the rest of the week for other things like recipes and crafts, or something else i'm working on {ssshhh}.

today, for starters, i'm guest blogging over at my friend kory's blog. first guest post ever, and i was so excited to do it! kory is so fun to work with, and i really just love her blog anyway, so you should check it out! p.s. i shared a recipe on her blog, so you might want to get your drool rag out.

secondly, i've been playing around with the camera now that pretty things are out and about. i'm a big fan of detail, close ups, and i guess what you call micro-shots? anyone? i don't know. i'm not a photographer.


i don't know about you, but flowers just bring me happiness. i love them with all my heart. and i especially love taking pictures of them. here are some more shots from my strolling.


if i turned some nature shots into downloadable desktops with a fancy quote and all, would anyone download them?? i've been thinking about it, but i don't want to waste my time if nobody would. would you?

Monday, March 11, 2013

power-packed parfait {recipe}

it's been quite a busy weekend as i mentioned earlier. i think i went to my church building a total of four different times saturday.. and then of course again on sunday. but really. i was just running, running, running. in a good way. but whew!

so let's talk about a good way to start a crazy day like my saturday! how about with a delicious breakfast? this was going to be on my pinterest challenge, but i couldn't wait to try it, so i ended up eating it before i started the challenge and had to pick something else. the original recipe is called the 6-flavor slimming breakfast sundae, but i just call it....


power-packed parfait 

servings: 2
gluten-free

1/4 cup oats
1/4 cup ground flax seed {or wheat germ or anything like that!}
1/4 cup of sesame seeds or sunflower seeds
1 handful of chopped nuts {we used almonds}
pinch of salt and ginger {or nutmeg, or cloves, or cinnamon, any kind of sweety spice}
2 containers or about 1 1/2 cups of yogurt {we like brown cow greek yogurt! mmm)
1 banana, all sliced up
1 cup of berries, fresh or frozen, any kind

1. mix all of the dry ingredients.
2. in two small bowls, parfait glasses, something pretty that's see through {wink! gotta see the layers!}, layer the dry mix, bananas, berries and yogurt until the glasses are full.
3. bon apetit! make sure to get a glass of milk to wash this goodness down with!

this can also make a great summer time snack! and it's one of those recipes you can just substitute in all kinds of ways to end up with different flavors [i love that because i get bored with the same food over again sometimes].

what do you like to eat for breakfast to get a kick start on a busy day?

Saturday, March 2, 2013

gluten-free crackers + black bean hummus {recipe}

hi i'm tasmin [hello, tasmin] and i'm a celiac.
on my honor i have been gluten-free for four days {totally had a tortilla on wednesday}.

ok, so i haven't been tested, but i definitely think i have a gluten sensitivity. i have noticed a huge change in my energy, joint pains, and other things since i have tried to refrain from wheat and gluten. you don't need the details, the point is, i am here to provide healthy, gluten-free, and yummy foods.

the first is probably like the best snack ever {at least this week}!


gluten-free "wheat" thins

original recipe
1 1/4 cups white or brown rice flour
1 1/2 tablespoons sugar
1/2 teaspoon salt, plus extra for sprinkling on
1/4 teaspoon paprika
4 tablespoons of butter {used whipped, so it's probably a little less than 4}
1/4 cup + 3-4 tbsp water{4 is almost too much}
1/4 teaspoon vanilla
other seasonings for different flavors.

parchment paper
wax paper

1. preheat oven to 400 degrees, prepare baking sheet with parchment paper.
2. mix dry ingredients in a medium sized bowl. 
3. Cut in butter. If you have a pastry cutter, awesome. if you don't use two forks. just don't mash the butter into the mixture. crumbly is what we are looking for, it will not all be crumbly though, some will still be dry, don't worry. 
4. mix water and vanilla and add to bowl. continue stirring with fork, then start using those pretty hands. it should all stick together in one big ball when you're done. it should not be sticky!
5. split ball in half. lay one part on the wax side of wax paper and put another sheet on top to roll out. a floured counter does not work with rice flour! {i already learned this} you want it about 1/16 of inch thin.  
5. sprinkle with salt and any other seasoning you want. use a pizza cutter or any other tool to cut into your shapes. i do 1in squares. i also squish the little edge pieces together lightly to make bigger pieces {they are not like pie crust, they actually stay together after you bake them}. use a spatula to remove from wax paper and place on tray. 
6. bake for 8-10 minutes for lightly cooked. i like mine a little brown on the edges, so i go for 11-12 minutes. just keep a close eye on them. 

notes: should take two different batches of baking. they don't get bigger, so you can place them closely together. store in air tight container. mine only last a week... only because i eat them that quickly. ...smile...

black bean hummus

1 can black beans, mooostly drained
1/4 cup {or a little less if you don't want that strong flavor... like me} tahini*
2 tbsp olive oil
1 tsp lemon juice
1 tsp smoked chipotle pepper tabasco sauce {or another hot sauce if you like}
2 large cloves of garlic
1/2 tsp salt
a couple grinds of pepper

1. put all ingredients in a blender.mixer.magic bullet.ninja.food processor.whatever and mix til it's smooth. if it's very think, add a little water or a little more olive oil.
2. done. enjoy! i could eat it with a spoon!

notes: good with avocado by itself, crackers, in a burrito, heat it up and top with cheese, onions, and olives for some yummy bean dip. be creative.

*i never knew what tahini was til i found some in the peanut butter section at my grocery store. it's not there in every store, though. check the asian food section, or other ethnic food sections. it's sesame seed paste. it can be pricy, but lasts a long time considering it only takes 1/4 per recipe.